Table of Contents
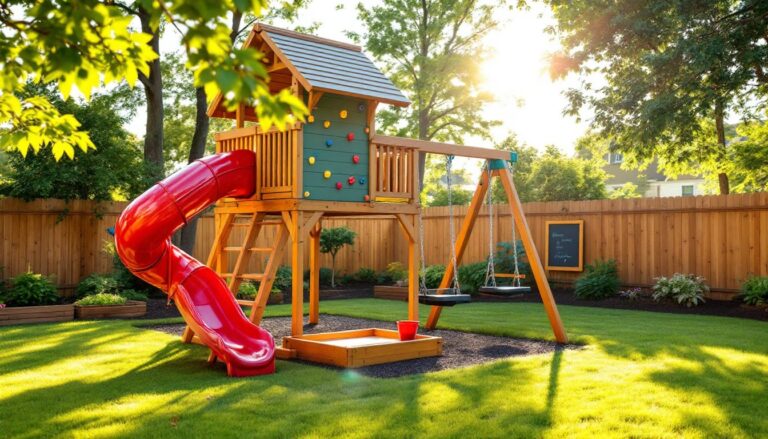
ToggleBuilding a backyard playground gives kids a dedicated outdoor space to burn energy, develop motor skills, and spend less time glued to screens. It doesn’t require a massive yard or a contractor’s budget, just a clear plan and a willingness to get your hands dirty. From simple tire swings to multi-level play structures, the right setup depends on the child’s age, available space, and how much sweat equity a homeowner is willing to invest. This guide breaks down practical playground ideas, safety standards, and material choices that turn an underused patch of grass into the neighborhood’s favorite hangout.
Key Takeaways
- Backyard playground ideas require careful planning of layout, drainage, and sun exposure to create a functional and safe outdoor space that grows with your children.
- Budget-friendly DIY options like tire swings, pallet climbing walls, and A-frame swing sets can be built for $150–$300 in materials while maintaining structural safety standards.
- Impact-absorbing surfacing is non-negotiable; choose from engineered wood fiber ($3–$5/cu ft), shredded rubber mulch ($6–$9/cu ft), or poured rubber ($15–$25/sq ft) based on your budget and fall height requirements.
- Natural playground elements using logs, boulders, and willow structures promote unstructured creative play while requiring minimal maintenance compared to manufactured equipment.
- Age-appropriate features matter: toddlers need low platforms and gentle slides, elementary kids benefit from traditional swing sets and climbing structures, and pre-teens engage with ziplines and obstacle courses.
- Professional inspection monthly for loose bolts, frayed ropes, and splintered wood, combined with proper anchoring in concrete footings, ensures long-term safety and durability.
Planning Your Backyard Playground Layout
Start by measuring the available space and marking boundaries with stakes and string. Most swing sets require a use zone extending at least six feet in all directions from the structure’s perimeter, more for taller swings. Check local zoning ordinances: some municipalities regulate playground placement relative to property lines or require setbacks from septic systems and utility easements.
Sun exposure matters. Position climbers and slides in partial shade during peak afternoon hours to prevent burns from hot metal or plastic surfaces. Morning sun helps dry off morning dew, but full western exposure turns equipment into a griddle by 3 p.m.
Drainage is non-negotiable. Low spots that pool water after rain create mosquito breeding grounds and turn safety surfacing into a soupy mess. If the intended area doesn’t drain well, plan to regrade or add French drains before installing equipment.
Sketch a rough layout on graph paper, noting existing trees, slopes, and overhead obstacles like power lines. Leave room for future expansion, kids outgrow toddler swings faster than expected, and adding a climbing wall or zipline later is easier when space is already allocated.
Budget-Friendly DIY Playground Ideas
Homeowners comfortable with a circular saw and drill can build functional playground elements for a fraction of retail costs. A basic A-frame swing set using pressure-treated 4×4 posts and 2×6 crossbeams runs around $150–$250 in materials, depending on lumber prices. Anchor posts in concrete footings at least 24 inches deep to prevent tipping, deeper in sandy or loose soil.
Pallet climbing walls offer vertical play without the expense of commercial rock walls. Sand and seal pallets thoroughly, then mount them horizontally to a sturdy frame using 3-inch exterior screws. Add climbing holds (available in bulk online) or cut handhold slots with a jigsaw.
Balance beams made from 6×6 landscape timbers staked at ground level teach coordination for under $40. For older kids, elevate beams 12–18 inches on concrete pier blocks, ensuring the timber spans no more than six feet between supports to prevent sagging.
Sandboxes are afternoon projects that deliver years of use. A 6×6-foot frame built from two 12-foot 2×10 boards (cut in half) holds roughly one cubic yard of play sand, budget $50–$75 for sand plus $30 for lumber. Line the bottom with landscape fabric to deter weeds and critters.
Tire Swings and Repurposed Materials
Tire swings remain playground classics because they’re nearly indestructible and cost next to nothing. Use a passenger car tire rather than a light truck tire, the smaller diameter suits kids better and weighs less on the support branch. Drill four to six drainage holes in the bottom to prevent standing water and mosquito larvae.
Hang the tire from a galvanized forged eyebolt (minimum 5/8-inch diameter) screwed through the branch with a washer on top and a locking nut underneath. The branch should be at least eight inches in diameter and free of cracks or decay. Attach swing chain or 3/4-inch braided polypropylene rope rated for at least 1,000 pounds.
Large cable spools (ask at electrical supply yards) become instant climbing structures or rotating drums when laid on their side. Pressure-wash and sand rough edges, then seal with exterior stain. Bolt two spools together side-by-side to create tunnels or platforms.
Reclaimed lumber works fine for non-structural elements like playhouse siding or sandbox borders, but always use new pressure-treated or naturally rot-resistant wood (cedar, redwood) for load-bearing components. Old wood may have hidden rot or structural damage that isn’t obvious until a kid’s full weight hits it.
Premium Playground Equipment Worth the Investment
Commercial-grade metal swing sets with powder-coated steel frames outlast wood structures in wet climates and resist the warping common with treated lumber. Expect to spend $800–$2,500 for a quality set with multiple swings, a slide, and a climbing component. Look for tube steel construction with welded joints rather than bolted connections, which loosen over time.
Modular climbing domes made from galvanized steel tubing encourage creative play patterns that static swing sets don’t offer. Kids route their own paths through the geometric framework, building spatial reasoning and grip strength. These typically start around $1,200 for a six-foot diameter model and require a 14×14-foot use zone with impact-absorbing surfacing.
Ziplines deliver the most thrill per square foot but demand careful installation. Building custom outdoor features requires precise tensioning and proper anchor points rated for dynamic loads. The cable should slope no more than six degrees (roughly one foot of drop per ten feet of run) to prevent riders from slamming into the end stop. Budget $300–$600 for a quality residential kit with a 90-foot cable, trolley, and proper tensioning hardware.
Composite playhouses with vinyl siding and shingled roofs cost more upfront ($2,000–$5,000) but require zero maintenance compared to wood structures that need annual staining. Many feature working doors, windows with shutters, and integrated porches that double as shaded play zones during summer.
Natural Playground Elements for Creative Play
Natural playgrounds using logs, boulders, and plants promote unstructured play that manufactured equipment can’t replicate. A cluster of large landscaping boulders (each weighing 500+ pounds) creates climbing challenges that adjust to a child’s growing skill level, no instruction manual needed.
Fallen logs sunk halfway into the ground become balance beams, borders, or tunnel supports. Choose rot-resistant species like black locust, cedar, or white oak. Avoid soft pines and poplars that decay within a few seasons. De-bark logs to discourage carpenter ants and wood-boring beetles, but leave the natural texture for grip.
Willow branch tunnels and teepees provide living play structures when planted in early spring. Push 6–8-foot willow cuttings (thumb-thick or larger) into moist soil in a circle, then weave and tie the tops together. Many will root and leaf out, creating a dense summer hideout. This works best in yards with ample outdoor space for projects.
Dig zones with sand, gravel, or soil mixing stations let kids build, pour, and engineer without structured outcomes. A 3×6-foot shallow pit filled with pea gravel and equipped with shovels, buckets, and PVC pipes for water channels keeps kids occupied for hours. Border the zone with landscape timbers to contain the mess.
Edible landscaping around playground perimeters serves double duty. Blueberry bushes, strawberry patches, and dwarf apple trees provide snacks and teach kids where food comes from. Avoid thorny plants like raspberries near high-traffic zones, and steer clear of anything toxic, no yew, oleander, or castor bean.
Safety Considerations and Ground Surface Options
Impact-absorbing surfacing is the most critical safety investment. The Consumer Product Safety Commission (CPSC) publishes fall height ratings for various materials. For structures with a deck height up to six feet, provide surfacing with a minimum tested depth, typically nine inches of wood chips or six inches of shredded rubber mulch.
Engineered wood fiber (EWF) costs less than rubber but requires annual top-offs as it compacts and decomposes. Budget $3–$5 per cubic foot. Shredded rubber mulch lasts longer and doesn’t attract insects, but runs $6–$9 per cubic foot. Both need containment borders to prevent migration into lawn areas.
Poured-in-place rubber surfacing offers the best fall protection and accessibility for wheelchairs, but installation requires professional crews and costs $15–$25 per square foot. Rubber tiles (interlocking or loose-laid) fall in the middle at $8–$12 per square foot and work as a DIY option over a compacted stone base.
Avoid sand as a primary safety surface under swings and climbers, it compacts hard when wet and doesn’t provide adequate impact absorption above four feet. Save sand for designated sandbox areas.
Inspect equipment monthly for loose bolts, cracked welds, frayed ropes, and splintered wood. S-hooks on swings should be fully closed with no gap wider than 0.04 inches (roughly the thickness of a dime). Check that outdoor entertaining spaces stay safe throughout the season.
Anchoring matters. Metal swing sets should be secured with auger-style ground anchors or concrete footings, not just staked into soil. Wind and aggressive swinging create rocking forces that pull inadequate anchors loose. Wooden structures need posts set in concrete at least one-third the height of the post above ground.
Wear safety glasses when cutting lumber or drilling hardware. Use hearing protection with circular saws and impact drivers. Keep a first-aid kit stocked with bandages, antiseptic, and tweezers for splinters near the play area.
Age-Appropriate Features for Different Stages
Toddlers (ages 2–5) need low platforms (no higher than 32 inches), gentle slides with enclosed sides, and bucket swings with full back support. Avoid chain swings and climbing ropes, motor skills aren’t developed enough to prevent falls. Sandboxes, water tables, and small playhouses suit this age group better than athletic equipment.
Elementary-aged kids (5–10) handle standard belt swings, 6–8-foot slides, and moderate climbing walls. This is prime age for traditional swing sets with monkey bars, but ensure the bars are appropriately spaced, 9 inches apart for younger kids, up to 12 inches for older children. Hosting outdoor activities for this age group works well with creative play zones.
Pre-teens (10+) crave challenge. Ziplines, climbing nets, higher platforms (8–10 feet), and obstacle courses keep them engaged. Incorporate gymnastic rings, rope ladders, and slacklines. At this stage, kids often enjoy helping with DIY building projects, turning playground expansion into a teaching opportunity.
Multi-age households benefit from zoned layouts: a shaded toddler area with a sandbox and small slide near the house, and a larger play structure farther out for older kids. This keeps younger siblings visible while giving older children space for rougher play.
Consider future use when investing in permanent structures. A 12×12-foot elevated playhouse with a climbing wall and slide serves toddlers now, but add a basketball hoop to the platform deck and swap the slide for a rock wall later. The bones of the structure stay relevant as kids grow.