Table of Contents
ToggleThe idea’s tempting: extra space for aging parents, a home office away from the chaos, or rental income without leaving your property. But before shopping for a prefab tiny home, homeowners need to navigate a maze of zoning laws, building codes, and permit requirements that vary wildly by jurisdiction. Some cities embrace accessory dwelling units (ADUs) with open arms, while others ban them outright. The difference between a legal backyard dwelling and a code violation often comes down to understanding local regulations, foundation requirements, and utility hookups. This guide walks through the critical checkpoints that determine whether a tiny home can legally land in a backyard, and what it’ll take to make it happen.
Key Takeaways
- Check local zoning laws first—many jurisdictions restrict or ban backyard tiny homes unless they meet specific lot size, owner-occupancy, and size cap requirements.
- A permanent foundation (concrete slab, crawl space, or pier-and-beam) is critical to satisfy building codes; wheeled tiny homes often face legal restrictions and may be classified as RVs rather than permanent dwellings.
- Building permits, electrical, plumbing, and mechanical permits are mandatory—skipping them risks fines and removal orders when selling or during inspections.
- Utility connections (water, sewer, electricity) require proper trenching, permit work, and code compliance; costs typically range from $8,000–$20,000 depending on distance and septic needs.
- Budget realistically between $65,000–$200,000+ for a 400-sq-ft backyard tiny home, including site prep, foundation, permits, and utility connections in a mid-cost market.
- Review HOA covenants and property setback requirements early—homeowner association restrictions can override municipal zoning approvals and delay or block the project.
Understanding Zoning Laws and Local Regulations for Backyard Tiny Homes
Zoning ordinances control what can be built on residential property, and they’re the first hurdle. Most municipalities classify backyard tiny homes as accessory dwelling units (ADUs), secondary residential structures subordinate to a primary dwelling. Some jurisdictions use terms like “granny flats,” “in-law suites,” or “backyard cottages,” but the legal framework is similar.
Start by checking the local zoning code, available through the city or county planning department. Key restrictions to look for:
- Lot size minimums: Many areas require a minimum lot size (often 5,000–7,000 sq ft) before allowing an ADU.
- Single-family zoning only: Some codes restrict ADUs to R-1 or similar single-family zones, excluding multi-family or mixed-use parcels.
- Owner-occupancy requirements: Certain jurisdictions mandate that the property owner live in either the main house or the ADU, not both as rentals.
- Size caps: ADUs are often limited to a percentage of the primary dwelling’s square footage (commonly 50–80%) or a fixed maximum (e.g., 800–1,200 sq ft).
California, Oregon, and Washington have state-level laws encouraging ADU development, preempting some local restrictions. Other states leave it entirely to municipalities, resulting in a patchwork of rules. Cities like Portland, Austin, and Seattle have streamlined ADU approval processes, while rural counties may have no provisions at all. If the property sits in an unincorporated area, county regulations apply, these can be more lenient or stricter than city codes.
Historic districts and overlay zones add another layer. Even if base zoning allows ADUs, a historic preservation board may impose design standards or ban new structures entirely. Check for any conditional use permits (CUPs) that might be required, which involve public hearings and neighbor notification.
Permit Requirements and Building Codes You Need to Know
A tiny home isn’t a shed or a playhouse, it’s a dwelling, and that means it must meet the International Residential Code (IRC) or local amendments to it. Skipping permits can result in fines, mandatory removal, or complications when selling the property.
Typical permits needed:
- Building permit: Required for any structure intended for habitation. Expect plan review, inspections during construction, and a final certificate of occupancy.
- Electrical permit: If connecting to the grid or installing a dedicated circuit, a licensed electrician must pull a permit and the work must comply with the National Electrical Code (NEC).
- Plumbing permit: For water supply, waste lines, and fixtures. Many jurisdictions require a licensed plumber for sewer or septic connections.
- Mechanical permit: Covers HVAC, gas lines, and ventilation systems.
Key IRC requirements for habitable structures:
- Minimum ceiling height: 7 feet for at least 50% of the floor area: lofts can be 6 feet 8 inches.
- Egress windows: At least one operable window or door for emergency exit in sleeping areas, with minimum dimensions (typically 5.7 sq ft opening, 24-inch height, 20-inch width).
- Smoke and CO detectors: Hardwired or with 10-year sealed batteries, interconnected if possible.
- Foundation and frost depth: Permanent foundations must extend below the local frost line to prevent heaving.
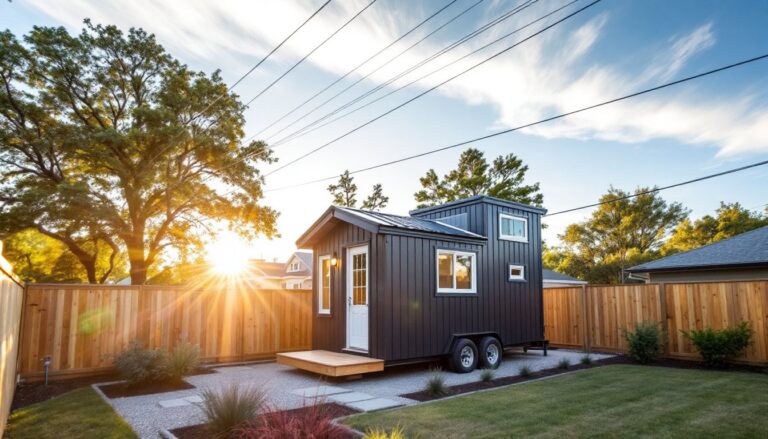
Prefab or manufactured tiny homes sometimes arrive with certification labels (like NOAH or RVIA for RV-style units), but these don’t automatically satisfy local building codes. Most planning departments require site-specific permits even for factory-built structures. If the tiny home is on wheels, it may be classified as an RV and banned from permanent residential use in many zones, more on that in the next section.
Foundation Options: Permanent vs. Mobile Tiny Homes
The foundation determines whether a tiny home is legally a dwelling or a vehicle. Permanent foundations, poured concrete slabs, crawl spaces, or pier-and-beam systems, qualify the structure as real property and typically satisfy zoning requirements for ADUs. Mobile tiny homes on trailers occupy a gray area: many codes prohibit using RVs or vehicles as permanent residences, even on private property.
Permanent foundation choices:
- Concrete slab: 4–6 inches thick, reinforced with rebar or wire mesh. Requires excavation, gravel base, vapor barrier, and proper curing. Cost-effective for level lots.
- Crawl space: Stemwall foundation with ventilation. Allows access to plumbing and utilities. Minimum 18-inch clearance in most codes.
- Pier-and-beam: Concrete piers or helical piles with a wood beam grid. Good for sloped sites or areas with expansive soil. Must extend below frost line.
If opting for a permanent foundation, the tiny home should be permanently affixed, wheels removed, anchored to the foundation with brackets or straps. This signals to code enforcement and tax assessors that it’s a structure, not a vehicle.
Wheeled tiny homes face restrictions. While marketed as “mobile,” most aren’t street-legal without special permits due to width and height. Parking one in a backyard often violates RV parking ordinances, which limit RVs to 72-hour stays or require them to be stored out of view. Some progressive cities (like Fresno, CA, or certain Austin districts) have carved out exceptions for THOW (Tiny Homes on Wheels) as ADUs, but they usually require the unit to be certified, connected to utilities, and registered as a permanent dwelling.
For true flexibility, consider a detachable foundation system: a pier foundation with removable attachment points. The home can later be moved if needed, but it meets code as a permanent structure during occupancy.
Utility Connections and Infrastructure Considerations
Tiny homes need the same utilities as full-size houses: water, sewer, electricity, and often gas. Running these services from the main house or street involves permitting, trenching, and sometimes easements.
Electrical: Most tiny homes need a dedicated 100-amp or 200-amp service panel, fed from the main house’s panel or a new meter. Trenching for underground conduit (typically 18–24 inches deep for residential branch circuits per NEC) involves digging, laying UF-B cable or running wires through PVC conduit, and inspection before backfilling. If the run exceeds 100 feet, voltage drop calculations may require larger wire gauge. Hire a licensed electrician unless you’re comfortable with service panel work and permit processes.
Water supply: Tap into the main house’s supply line using a tee fitting and run PEX or copper to the ADU. Bury supply lines below the frost line (varies from 6 inches in warm climates to 4+ feet in northern regions). Install a shut-off valve at the main connection and another at the ADU for maintenance. Water pressure may drop if the main line is undersized, consider a booster pump for long runs or hilly lots.
Sewer and waste: If the property has municipal sewer, connect the ADU’s waste line to the existing lateral using a wye fitting or cleanout access. Maintain minimum slope (1/4 inch per foot for 3-inch drain lines, 1/8 inch per foot for 4-inch) to prevent clogs. For septic systems, check capacity, older tanks may need upgrading to handle additional bedrooms. The health department or septic inspector can assess whether a larger tank or additional leach field is required.
Off-grid alternatives: Some homeowners choose composting toilets, rainwater collection, and solar panels to avoid utility hookups. These systems appeal to those in modern in-law units designed for minimal environmental impact, but local codes may still require grid connections even if they’re not actively used.
HOA Restrictions and Property Setback Requirements
Even if municipal zoning allows ADUs, homeowners association (HOA) covenants can override local permissions. CC&Rs (Covenants, Conditions, and Restrictions) often prohibit outbuildings, limit external structures to garages or sheds, or require architectural approval for any addition. Review the HOA bylaws and submit a formal request before purchasing materials.
Some states (California, for example) have enacted laws limiting HOA authority over ADUs, but enforcement varies. If the HOA denies the request, homeowners may need to petition the board, seek a variance, or challenge the restriction legally, an expensive and uncertain path.
Setback requirements dictate how close a structure can sit to property lines, streets, and other buildings. Typical residential setbacks:
- Rear setback: 5–10 feet from the rear property line.
- Side setbacks: 5–10 feet from side lot lines.
- Front setback: Often 20–30 feet from the street, though ADUs are usually built in rear yards.
- Separation from main dwelling: Some codes require 10–20 feet between structures for fire safety.
Accessory structures sometimes enjoy reduced setbacks, check for ADU-specific exemptions. Fire-rated walls or sprinkler systems may allow closer placement. Always verify with a site plan and a survey to avoid encroachment.
Easements also matter. Utility easements (for power lines, sewer mains, or drainage) restrict building even within property boundaries. Placing a tiny home over an easement can trigger removal orders if the utility company needs access.
Cost Breakdown: What to Budget for Your Backyard Tiny Home
Backyard tiny home costs vary by region, foundation type, and finish level, but here’s a realistic breakdown for a 400-sq-ft ADU in a mid-cost market (2026):
Tiny home purchase or construction:
- Prefab shell: $40,000–$80,000 (basic finishes, delivered)
- Turnkey prefab: $80,000–$150,000 (fully finished, appliances included)
- Custom build: $100–$250 per sq ft (contractor-built on-site)
Site prep and foundation:
- Slab foundation: $4,000–$8,000 (400 sq ft, includes grading and fill)
- Pier-and-beam: $6,000–$12,000 (depending on soil and frost depth)
- Site grading and drainage: $1,500–$4,000
Utility connections:
- Electrical service and trenching: $3,000–$7,000 (100-foot run from main panel)
- Water line and hookup: $2,000–$5,000
- Sewer connection: $3,000–$8,000 (or $8,000–$20,000 for septic upgrade)
Permits, fees, and inspections:
- Building permits: $1,500–$5,000
- Impact fees: $0–$15,000 (varies widely: some cities waive ADU fees)
- Architectural/engineering plans: $1,000–$3,000 (if required for permit submittal)
Miscellaneous:
- Landscaping and pathways: $1,000–$4,000
- HVAC (mini-split system): $2,500–$5,000
- Interior finishes and upgrades: $5,000–$20,000 (flooring, countertops, fixtures)
Total estimated range: $65,000–$200,000+. Costs climb in high-cost-of-living areas or when zoning requires architect-stamped plans. Budget for contingencies (10–15% over estimates) to cover unforeseen issues like poor soil, old sewer laterals, or permit delays. For detailed home improvement project costs and timelines, resources like This Old House and Curbed offer real-world case studies and expert advice.
Conclusion
Putting a tiny home in a backyard is possible, but it’s not a shortcut around regulations. Success depends on understanding local zoning, securing the right permits, choosing a code-compliant foundation, and budgeting for utility connections and setbacks. Start with a call to the planning department, review HOA rules early, and line up licensed contractors for electrical and plumbing work. Done right, a backyard ADU adds functional space and property value, skipping steps invites costly corrections or removal orders.