Table of Contents
ToggleShipping pallets cost nothing, or close to it, and offer a nearly limitless supply of reclaimed wood for <a href="https://canmeximports.com/backyard-entertaining-tools/”>backyard projects. While most people see a beat-up pallet as trash, DIYers know it’s a blank slate for furniture, planters, fences, and more. Unlike buying new lumber at $8–$12 per board foot, pallets offer a free (or cheap) alternative that’s already been cut, kiln-dried, and assembled. The catch? You need to choose the right pallets, prep them properly, and understand their structural limits. This guide walks through proven pallet ideas for backyard transformations, including furniture builds, vertical gardens, and entertaining structures that actually hold up outdoors.
Key Takeaways
- Backyard pallet ideas offer a cost-effective alternative to new lumber, with free or cheap materials already cut and assembled into sturdy frameworks.
- Always choose HT (heat-treated) stamped pallets and avoid MB-stamped ones; inspect for cracks, rot, and staining to ensure safety for seating, food contact, or skin exposure.
- Exterior wood stain or deck sealer with UV inhibitors must be applied in two coats on all sides to extend pallet lifespan from 1–2 years to 5+ years outdoors.
- Reinforce pallet furniture joints with 3″ deck screws and limit weight to 250 lbs. per seat section; disassembled and reassembled pallets lose structural integrity compared to new framing.
- Vertical pallet planters maximize small yard space and prevent slug damage by keeping plants off the ground, but require secure L-bracket mounting to fence studs or posts to handle 60–80 lb. soil weight.
- Larger pallet structures like privacy screens and bars may require building permits and engineered footings; check local codes before construction, especially for installations taller than 6 feet.
Why Pallets Are Perfect for Backyard DIY Projects
Pallets deliver three advantages: they’re cheap, they’re modular, and they’re already assembled into sturdy frameworks. A standard GMA pallet (48″ × 40″) uses stringers (the 2×4 support boards) and deck boards (the top and bottom slats) fastened with ring shank nails that resist pull-out under load. This pre-built structure cuts project time in half compared to starting from raw lumber.
Not all pallets are safe for DIY use. Look for the HT stamp (heat-treated), which means the wood was kiln-dried instead of chemically treated with methyl bromide (MB). Avoid MB-stamped pallets for any project involving food, seating, or prolonged skin contact. Check for cracks, rot, or excessive staining, pallets used to haul chemicals or food waste aren’t worth the risk.
Weather resistance is the weak point. Most pallet wood is southern yellow pine or oak, both of which rot when exposed to ground contact and UV without protection. Before using pallets outdoors, sand away splinters (80-grit on an orbital sander), then apply exterior wood stain or deck sealer with UV inhibitors. Two coats on all sides, including end grain, extend lifespan from 1–2 years to 5+ years. For ground-contact projects like raised beds, use plastic sheeting or landscape fabric as a moisture barrier.
Safety gear matters when breaking down pallets. Wear safety glasses (pallet nails can snap and fly when prying), leather gloves (splinters are guaranteed), and a dust mask if sanding. A reciprocating saw or oscillating multi-tool cuts nails flush faster than a pry bar, and a miter saw handles clean crosscuts better than a circular saw for finish work.
Pallet Furniture Ideas to Upgrade Your Outdoor Space
Pallet furniture works best for low-stakes outdoor seating where weight and weather exposure are manageable. A single GMA pallet can become a coffee table, but stacking two or three pallets creates benches, daybeds, or sectional frames. The key is reinforcing joints and adding proper cushioning, bare pallet slats aren’t comfortable and tend to sag under consistent weight.
DIY Pallet Lounge Chairs and Sofas
A basic pallet sofa uses three pallets: two stacked horizontally for the seat base and one stood vertically as the backrest. Secure the backrest to the seat base with 3″ deck screws (two per connection point) driven through the stringer into the seat deck boards. Without this reinforcement, the backrest will tip backward under load.
Add outdoor cushions cut to size, 4″ high-density foam wrapped in Sunbrella or similar UV-resistant fabric holds up better than standard indoor foam, which absorbs moisture and mildews. You can also use pallet wood deck boards to build custom armrests, attached with pocket hole screws or corner brackets.
For a lounge chair, angle the backrest by cutting the rear stringer legs at 15–20 degrees (use a speed square to mark the angle). This simple modification turns a rigid bench into a reclined chair. Finish with the same exterior sealer mentioned earlier, unfinished pallet furniture weathers to gray within one season and splinters within two.
Pallet furniture isn’t load-rated like commercial outdoor furniture. A standard pallet supports 2,500 lbs. of evenly distributed static load when new, but disassembled and reassembled pallets lose structural integrity. Limit weight to 250 lbs. per seat section and inspect joints annually. If a project involves kids or frequent use, building dedicated outdoor seating with new framing lumber is the safer route.
Pallet Garden Projects That Add Beauty and Function
Vertical gardening on pallets maximizes growing space in small yards and keeps plants off the ground, reducing slug damage and soil splash. A single pallet can hold 8–12 small pots or a dozen herb starts, and the slatted design provides natural drainage.
Vertical Pallet Planters and Herb Gardens
To convert a pallet into a vertical planter, stand it upright and attach landscape fabric or weed barrier cloth to the back and bottom using a staple gun (heavy-duty staples, not office staples). This creates pockets to hold soil without it spilling through the slats. Fill each tier with potting mix, not garden soil, which compacts and drains poorly in containers.
Secure the pallet to a fence or wall using L-brackets or fence brackets anchored into studs or solid framing. A soil-filled pallet weighs 60–80 lbs., and fence pickets alone won’t support that load. If mounting to a fence, drive 3″ lag screws through the pallet stringers into the fence posts.
Herbs like basil, thyme, and parsley thrive in pallet planters because their shallow root systems (4–6″ deep) fit the confined space. Tomatoes and peppers need deeper soil and should go in ground-level raised beds instead. Water vertical planters more frequently than in-ground gardens, elevated containers dry out faster, especially in summer heat.
For a horizontal raised garden bed, stack two or three pallets on edge to form a perimeter, then line the interior with landscape fabric and fill with soil. This method works for leafy greens, radishes, and compact root vegetables. Reinforce corners with corner braces or drive rebar stakes through the pallet stringers into the ground to prevent bowing as soil settles.
Many backyard entertaining setups incorporate edible gardens as both decor and function. Pallet herb walls near grilling stations let hosts snip fresh garnishes mid-cook. Free building plans for pallet planters are widely available on resources like Ana White, which offers dimensioned diagrams and cut lists.
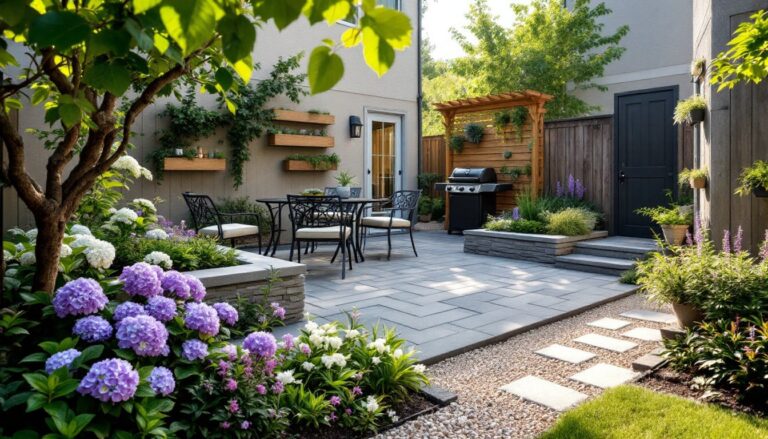
Pallet Structures and Features for Backyard Entertaining
Pallets scale up to larger structures, fences, pergolas, privacy screens, and even outdoor bars. These projects require more planning than furniture builds, and some may trigger permit requirements depending on size, height, and whether they’re anchored to footings.
A pallet privacy screen uses 4–6 pallets stood on edge and zip-tied or screwed together side-by-side. Anchor the bottom stringers to the ground with 18″ rebar stakes driven through pre-drilled holes, or bolt the screen to a 4×4 post set in concrete if local codes require wind-rated installations. Screens taller than 6 feet often require permits and engineered footings, check with your building department before construction.
Pallet bars combine a countertop (often a sheet of 3/4″ plywood faced with tile, zinc, or treated lumber) with a pallet base for storage and structure. Build a two-pallet-high frame, add a 2×4 ledger board across the top for countertop support, and finish with exterior-grade materials. Bar tops take abuse from spills, UV, and temperature swings, seal with marine-grade spar urethane or epoxy for durability.
For outdoor storage benches, hinge a pallet lid onto a pallet base using exterior-rated strap hinges. Line the interior with a plastic bin to keep contents dry, pallet slats aren’t watertight. This design works for storing cushions, garden tools, or firewood.
Pallet walkways and deck tiles offer a rustic look but aren’t code-compliant for permanent structures in most jurisdictions. They work as temporary pathways over grass or gravel. Lay pallets flat, fill gaps with pea gravel, and stake edges with landscape spikes. Walkways need releveling every year as pallets settle unevenly.
When planning larger builds, online communities like Instructables and Curbly feature step-by-step pallet project breakdowns with photos and material lists. Many projects suitable for hosting outdoor gatherings incorporate pallets as cost-effective building blocks, though load-bearing structures (pergolas, arbors, decks) should use new pressure-treated lumber for posts and beams.
Always apply finish before assembly on complex projects, it’s easier to coat individual boards than reach into tight corners with a brush. Use exterior latex stain or solid-color deck stain for consistent coverage, or semi-transparent stain to let the wood grain show. Pallet wood grain varies wildly (oak, pine, poplar), so solid stains produce a more uniform look.
Conclusion
Pallet projects deliver real backyard upgrades without the new-lumber price tag, but only when builders choose safe materials, reinforce joints, and weatherproof properly. Start with small builds, a planter or side table, to learn how pallets disassemble and fasten before tackling furniture or structures. The skills transfer to other carpentry projects, and the cost savings free up budget for better tools or finishes.