Table of Contents
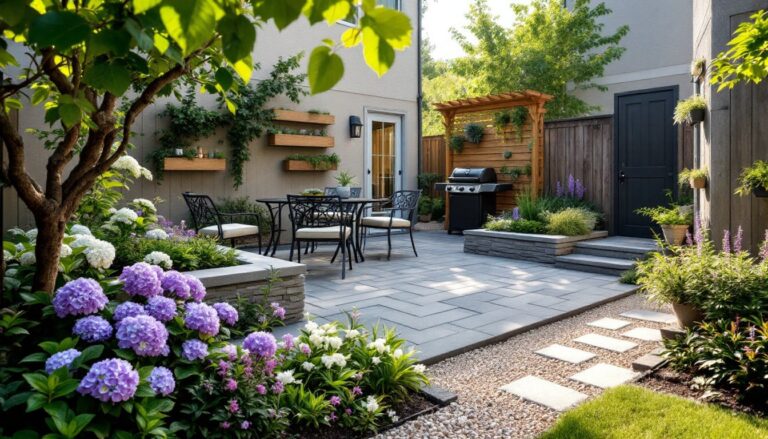
ToggleBrick patios never go out of style, they’re durable, affordable, and surprisingly versatile. Whether you’re working with a sprawling backyard or a compact urban space, the right brick paver patio ideas can turn a bare slab or patch of lawn into a functional outdoor room. Unlike poured concrete or flagstone, bricks offer modular flexibility: you can DIY most installations without heavy equipment, adjust layouts mid-project, and replace individual pavers if one cracks. This guide covers fifteen proven designs, from classic herringbone to modern grid patterns, with practical advice on materials, layout, and execution. Expect real measurements, tool recommendations, and honest assessments of what you can tackle yourself versus when to call in help.
Key Takeaways
- Brick patio ideas with herringbone patterns remain the gold standard for durability, visual appeal, and weight distribution, making them ideal for both high-traffic and low-traffic outdoor spaces.
- A proper foundation is essential: use a 4-inch compacted gravel base topped with 1 inch of leveling sand to ensure your brick patio lasts decades without shifting or settling.
- Budget-friendly brick patio designs start at $300–$400 for small 6×8-foot spaces using reclaimed bricks, dry-laid installation with polymeric sand, and running bond layouts that require minimal cuts.
- Mixed material patios combining brick with stone (bluestone, flagstone) add texture and visual interest while reducing perimeter cuts and stretching your budget across a larger area.
- Running bond is the fastest and most forgiving pattern for DIY beginners, offering strong interlock with minimal cuts, making it ideal for first-time patio builders.
- Edge restraint is critical for all brick patios—use steel or aluminum edging staked every 12 inches along the perimeter to prevent shifting and maintain long-term structural integrity.
Classic Herringbone Brick Patterns for Timeless Appeal
Herringbone remains the gold standard for brick patios, it’s strong, visually interesting, and locks pavers in place better than running bond or stack bond. The 45-degree or 90-degree angled layout distributes weight evenly, making it ideal for driveways and high-traffic zones. For a patio, the 45-degree herringbone adds movement and breaks up large expanses.
Standard brick pavers (3⅝” × 7⅝” × 2¼” nominal) work perfectly for this pattern. Plan for about 10% overage to account for cuts along edges. You’ll need a wet-tile saw or masonry blade on a circular saw for clean angle cuts, a hammer and chisel takes too long and leaves rough edges.
Start with a 4-inch compacted gravel base topped by 1 inch of leveling sand. Screed the sand flat, then begin laying from one corner at your chosen angle. Use spacers (or rely on the built-in nibs if your pavers have them) to maintain consistent joints. Border the field with soldier course (pavers laid perpendicular) to frame the pattern and reduce fussy cuts.
Many outdoor entertaining ideas feature herringbone for good reason: the pattern scales beautifully from a 10×10-foot café table nook to a 30×20-foot dining terrace. It also handles irregular shapes, curved edges just require more trimming, but the core pattern stays intact.
For small backyard brick patio ideas, herringbone adds visual depth without overwhelming tight quarters. Stick to a single brick color to keep it clean, or alternate two tones (think red and charcoal) to emphasize the zigzag.
Modern Minimalist Brick Patio Designs
Minimalist brick patios lean on stack bond or running bond layouts, wide joints, and restrained color palettes. Stack bond (grid pattern, all joints aligned) looks crisp and geometric but offers less interlock, fine for low-traffic patios, risky for driveways. Running bond (each row offset by half a brick) is stronger and nearly as clean.
Use oversized pavers (12″ × 24″ or 16″ × 16″ concrete pavers with a smooth brick finish) for a streamlined look. These install faster than standard bricks and create fewer grout lines. Leave ½-inch to ¾-inch joints filled with polymeric sand in light gray or white to contrast with dark pavers, this emphasizes the grid and prevents weed growth.
Monochrome schemes dominate modern designs: charcoal, graphite, or iron-spot bricks paired with matching mortar. If the patio adjoins a contemporary home with steel or stucco cladding, this continuity matters.
Edge restraint is critical with stack bond. Install aluminum or steel paver edging staked every 12 inches along the perimeter, plastic edging flexes too much and lets the grid shift. For a seamless transition, run the brick flush with the lawn and use a mow strip (a single row of pavers set just below grade) so the mower wheel rides on brick, not grass.
Skip decorative borders and insets, minimalism means restraint. If you want definition, use a single contrasting row at the threshold or around a fire pit, but keep it linear and intentional.
Mixed Material Brick Patios: Combining Stone and Pavers
Mixing brick with flagstone, bluestone, or cut granite adds texture and breaks up monotony, especially on larger patios. The key is establishing a clear hierarchy: one material should dominate, the other accents.
Common combos:
• Brick field with stone border: Lay your primary pattern (herringbone, running bond) in brick, then frame it with 12″ or 18″ bluestone slabs. The stone acts as a visual anchor and reduces the number of perimeter cuts.
• Stone stepping pads with brick infill: Set large flagstones (24″ × 36″ or irregular shapes) at key points, under a grill, around a fire pit, at entryways, then fill gaps with soldier-course brick. This works well for informal, cottage-style gardens showcased in many landscape inspiration guides.
• Grid patterns: Alternate brick squares (4 bricks in a pinwheel or basket-weave) with cut stone squares. This checkerboard approach suits formal courtyards.
Material compatibility matters. Brick and stone have different thicknesses, standard brick is 2¼” thick, bluestone is often 1½” or 2″. Adjust your base depth per zone so the finished surface is level. Use separate sand beds screeded to different heights, or shim the stone with additional sand.
Joint width also varies: brick takes ⅜” polymeric sand joints: stone often sits with ½” to 1″ joints filled with mortar or decomposed granite. Keep joint materials consistent within each material type to avoid a patchwork look.
Budget roughly $8–$15 per square foot for brick and $15–$30 for natural stone (varies widely by region and stone type). Mixed designs let you splurge on stone accents without blowing the budget.
Circular and Curved Brick Patio Layouts
Circles and curves soften hardscape and suit organic, flowing garden plans, but they demand more labor and waste. Radial patterns (bricks radiating from a center point) look impressive but require tapering joints and frequent cuts. Concentric rings are easier: you lay full bricks in arcs, trim to fit, and accept slightly wider outer joints.
Start by establishing your center point and driving a stake. Attach a string equal to your radius (half the patio diameter) and scribe the perimeter with marking paint. For a 12-foot-diameter circle, you’re working with a 6-foot radius.
Install edge restraint first, flexible plastic or metal bender board follows curves smoothly. Stake every 10–12 inches and backfill outside the restraint to lock it in place.
Lay bricks in rings, starting from the outside and working inward (easier to adjust spacing). Use a speed square or angle finder to maintain radial alignment. Joints widen as you move outward: fill with polymeric sand and accept the variance, it’s unavoidable without custom-cut wedge pavers.
For serpentine or kidney-shaped patios, sketch the outline with a garden hose, then use the same flexible edging. Running bond adapts to gentle curves: sharper bends need more cuts. A wet-tile saw with a diamond blade is non-negotiable here, cutting 40+ angle pieces with a grinder takes hours and wears you out.
Curved patio brick ideas work beautifully around trees, pools, or garden beds. Just don’t skimp on base prep: uneven settling shows up fast on curves because the eye tracks the arc.
Budget-Friendly DIY Brick Patio Ideas
You can build a solid 10×12-foot brick patio for under $600 if you source materials carefully and do the labor yourself. Here’s how to keep costs down without cutting corners on durability.
Reclaimed or “seconds” bricks often run $0.50–$1.00 per brick versus $1.50–$3.00 for new pavers. Check salvage yards, Craigslist, or Habitat for Humanity ReStores. Expect color variation and some chipped edges, this adds character on informal patios but won’t suit formal designs. Inspect for severe cracks or spalling (flaking): light cosmetic damage is fine.
Skip mortar for a dry-laid install. Gravel base plus polymeric sand joints hold up fine in most climates and eliminate mixer rental, troweling, and cleanup. You’ll need:
• Crushed gravel (¾-inch minus): $30–$50 per ton, delivered
• Leveling sand: $5–$8 per 50-lb bag
• Polymeric sand: $25–$40 per 50-lb bag (covers ~100 sq ft of ⅜” joints)
• Landscape fabric: $20–$30 per roll
• Edge restraint (plastic): $1.50–$2.50 per linear foot
Tool list (assume you’re borrowing or renting):
• Plate compactor (rent for $60–$80/day)
• Wet-tile saw with diamond blade (rent for $50–$70/day or buy a budget model for $120)
• Level (4-foot and 2-foot)
• Rubber mallet
• Screed board (use a straight 2×4)
• Wheelbarrow, shovel, rake
DIY layout tip: Running bond is the fastest pattern for beginners, minimal cuts, forgiving alignment, and strong interlock. Avoid basket-weave or complex insets on your first project.
For small backyard brick patio ideas on a budget, consider a 6×8-foot pad under a bistro set. That’s only 48 square feet, about 150 bricks and one weekend’s work. You’ll spend $300–$400 total, including base materials.
Permit check: Most jurisdictions don’t require permits for ground-level, non-structural patios under 200 square feet, but verify locally. If you’re tying into existing drainage or building over utilities, call 811 for locates before digging.
Brick Patio Color Combinations and Finishes
Color choice affects mood, heat retention, and long-term maintenance. Red clay bricks are traditional and pair well with Colonial, Craftsman, or farmhouse architecture. They show dirt less than light pavers but can feel heavy in shaded yards.
Charcoal or iron-spot bricks (gray with dark flecks) suit modern and industrial styles. They absorb more heat, plan for shade structures or lighter-colored furniture if your patio gets full sun.
Buff, tan, or sandstone tones work in Mediterranean, desert, or coastal settings. They reflect light, stay cooler underfoot, but show stains (grease, rust, tannin) more readily. Seal these with a penetrating silane/siloxane sealer (coverage ~200–300 sq ft per gallon) every 2–3 years.
Multi-color blends (reds, browns, and tans mixed) camouflage wear and look less flat than monochrome. Buy from a single lot to ensure consistent ratios, color batches vary.
Finish types:
• Tumbled brick: Rounded edges, aged look, hides chips. Costs 20–30% more but ideal for rustic or reclaimed aesthetics.
• Smooth-top pavers: Easier to sweep, better for furniture stability, modern appearance.
• Wire-cut (textured): Slight ridges improve traction when wet, casual feel.
Border and accent tricks:
• Frame a red field with a single row of charcoal soldier course for crisp definition.
• Inlay a diamond or square pattern in contrasting color at the patio center, classic focal point.
• Use the same brick but rotate the pattern (switch from running bond to herringbone) within borders to add interest without new materials.
Efflorescence (white salt deposits) appears on new bricks as moisture migrates. It’s cosmetic and fades with weathering. Avoid acid cleaners in the first year, they can etch the surface. Brush with a stiff broom and rinse if it bothers you.
Conclusion
Brick patios deliver a rare combination: they’re DIY-friendly, durable for decades, and adaptable to nearly any design style. Whether you’re installing a classic herringbone layout, mixing materials for texture, or working within a tight budget, success hinges on solid base prep and realistic planning. Don’t rush the gravel compaction or skimp on edge restraint, those steps determine whether your patio lasts five years or fifty. Pick a pattern that matches your skill level and your home’s architecture, order 10% extra material, and tackle it in stages if needed. The result is an outdoor space that handles everything from morning coffee to evening entertaining without a hint of builder-grade blandness.